RC Knight Rider Car With Touchscreen Control
When I was a kid I loved Knight Rider. I had a plastic toy KITT car that would play sounds from the show when you pressed the license plate. It was a great toy. I recently looked it up online and was thinking about buying one. They weren't crazy expensive. But then I got to thinking, I could make that car and something better. The best thing about all of the affordable tech we have now is that you can affordably make a lot of things you dreamed of as a kid pretty easily.
I figured 3D printing would be the easiest way to go. I started looking online and sure enough found some nice 3D models of KITT. On Etsy I found a great one already scaled to fit on a 1/10 scale RC car frame. Looking around online i found the Tamiya TT-02 for around $100. Ok, so thats a plan. Even though there are some free models I went ahead and purchased the model on Etsy because I liked the way it was split and sized. I know a lot of people will say split it and resized it yourself but I'm willing to play a reasonable price for the convenience. I first tried printing it on a my CR-10. It came out ok but some parts were a bit deformed and were going to need too much sanding/repair. I think this was more a problem with my CR-10 than anything. So, I opted to resin print it in my Saturn. That required splitting it into 3 parts (so much for pre- split). However, it printed out great in resin. Heavier and more fragile but really nice and smooth.
 .
.  .
. 
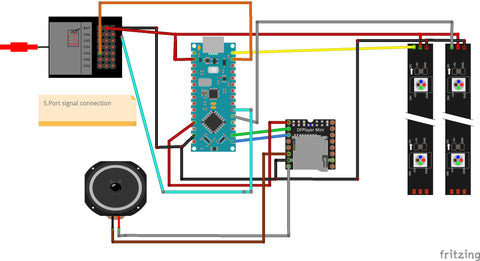
The other part of this project was the electronics. I wanted to be able to play sounds I selected. My first solution was to use a switch on my Jumper T18 to toggle through sounds and a different switch to trigger the selected sound. The playback would be through a DFPlayer Mini controlled by an Arduino. If this sounds familiar, it's because it is. I love the simplicity of this setup.

I found some Arduino libraries that would read switch inputs from a RC receiver and let me use that to trigger playback. Two problems though. Control was clumsy and it didn't really work well with three or four inputs. What I really wanted was a sexy touchscreen interface on my Jumper T-18. The problem with that was how to get a button press on the Jumper touchscreen to the Arduino. Turns out EdgeTx has me covered. The Lua script programming language has an option to send data via FrSky S.Port that can be read by an Arduino. Mostly people use this for sensor telemetry and Ardupilot. My needs were much simpler. I just needed to be able to send a number to the Arduino. Based on that number the Arduino would either play a sound or trigger a function.
I needed to learn Lua script and find out how to send S.Port data. I figured it out with help from a guy who wrote a very useful Arduino library. Also, the EdgeTx crew has a very functional touchscreen demo widget called LibGUI. I basically changed that interface to meet my needs. I added an image of KITTs console, changed the color scheme and added a scrollable text menu of the sounds. The code essentially sends a number via S.Port on each button press. The receiver passes that to the Arduino via the S.Port and the Arduino uses it to trigger sounds.
The code is at the end of the blog blog post. I figure not everybody is interested and I didn't want to interrupt the flow.
The body build was a fairly straight forward. I glued the three parts together and sanded using Bondo as filler. Painting took a while. Mostly because I wasn't patient enough to wait for the paint to dry or paint in thin coats. Eventually, I got the body painted up. My biggest challenge was the windows. The rear in particular. My original plan was to 3D print the windows in clear resin using the provided models. Problem was they didn't fit very well. Possibly another problem with my printer. Since the shapes were pretty straight forward, I just decided to laser cut them out of thin plexi. Worked out great except for the rear window which is a more complex shape. For this I ended up making a vacuum form shape of the 3D print. That gave me some flexibility to cut and shape it. I still had problems gluing it in place but I think it came out well.

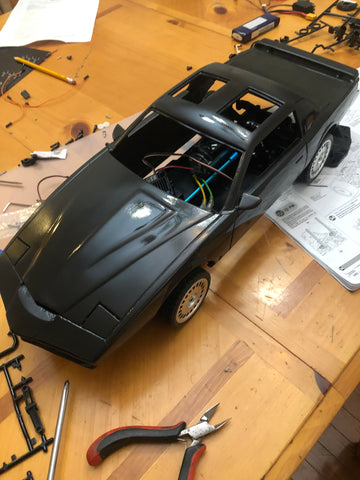
I really didn't want to see wires everywhere inside the car. So I 3D printed a simple case and stuffed the Arduino, DFPlayer and X8R receiver in it. I left holes so I can connect the servo, speaker and speed controller. I also used a 5 pin connector to run the wires to the lights in the body.


The scanner in the body is controlled by a separate Arduino Nano Every. Originally, I planned to keep it simple and use a WS2811 strip for the scanner. That way I could just use 3 wires to control it and an existing library. I had that setup in about 30 mins. Except.... the strip didn't fit in the slot for the scanner. The body is 1/10 scale. One of the things I never realized is that KITT's scanner is mounted on the very front. For some reason I thought the lights were recessed. It makes sense because otherwise you would not be able to see the lights from such a wide angle. So, I had to go old school with 10 small LEDs wired up on the Arduino to fire in sequence. Time consuming but really accurate looking.
The front and rear headlights do use WS2811 strips. So those were fairly straight forward. The front lights are triggered by the touchscreen interface. The rear lights trigger when the throttle is below 50%. So after gluing up a bunch of lights and wires I had myself a fairly functional KITT.
The body is mounted with magnetic mounts to remove the need for protruding body clips. I designed some clip on hubcaps to look like KITTs. Those are resin printed. I'm using some standard Tamiya metal rims. KITT's have more spokes but I think these are a pretty good substitute.
I'm really pleased with the final product.
 .
. 
The other thing I like is that the code could really be used to trigger just about any function controlled by an Arduino on a remote vehicle. I will admit the S.Port control is a little spotty and I'm not sure why. Not every button press results in triggering a function. I can't quite tell if the data I'm sending isn't being picked up or what. If anybody has input on how to get make the code give a consistent trigger I'd appreciate it.
I still need to get some video of it driving and I'm going to try to add a louder speaker. I really need to be able to hear the turbo boost when I press it while driving!!!
Circuit diagram:
Here is the Lua script code:
Here is the Arduino code for the sounds and brakes:


I’d be really interested in getting one or getting a list for the parts or even paying to have one made please email me a write me and let me know what your thoughts are cause I’d really like to get one of these.
Leave a comment